I have been working on this Unifi Wifi setup nonstop for the past three days now and have made a lot of really good progress. As discussed In order for this to work we need different wifi networks one for the public, students, and security. In order to make this happen, we can create different SSIDs from the Unifi controller and assign each one to a separate VLAN which allows different IPs to be handed out by the USG and keeps the devices separate. We can also create user groups that allow for bandwidth limitation and I will have another post about that later when we do the final setup.
Once I had the VLANs and separate networks figured out I needed to work on logging into the Wifi. The public network will be open with no password but have slow internet speed that doesn’t allow for video streaming. Meanwhile, the student’s wifi will allow for video streaming for educational use. In order for this to work, we need some robust way of keeping the public off the student’s Wifi. A simple password isn’t enough since a student could just give it to anyone they choose. Instead, we can take advantage of the school emails already assigned to students.
Unify has a great software feature that allows guests to log onto wifi using social media accounts including google. We can set this up to reject any email that is not assigned by the school board it will then ping Google’s servers to verify the email and password then allow them onto the network. The process of setting this out was made out to be very simple, however, I ran into multiple problems that I had to spend hours working through so I will go over in detail how to set this up.
First things first you need your Unifi controller software running somewhere whether it be your laptop or a Cloud key or an Amazon server instance but for the guest portal to work the Unifi controller software must always be running. The controller software is actually running the webpage that pops up when you try to connect to the guest network so without you will not be able to log onto the network.
The next requirement for social login to work is a publically resolvable IP address. In other words, Google’s or any other social platform’s servers need to be able to communicate with your cloud controller on the public internet. This step requires you to port forward the IP address and port your controller software is running on. On Xfinity Xfi this is fairly simple to do first you will go to your Xfi homepage and you should see this.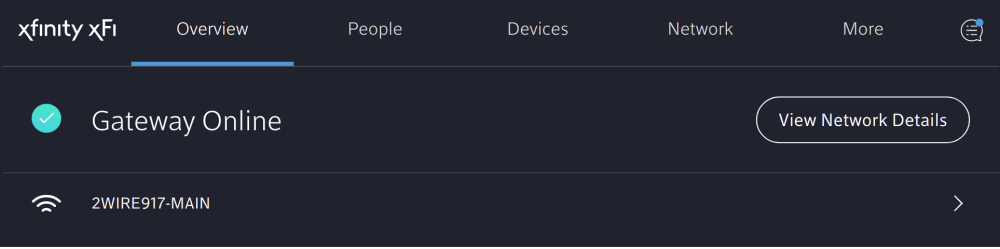
From here you click View Network details and it should bring you to this page.
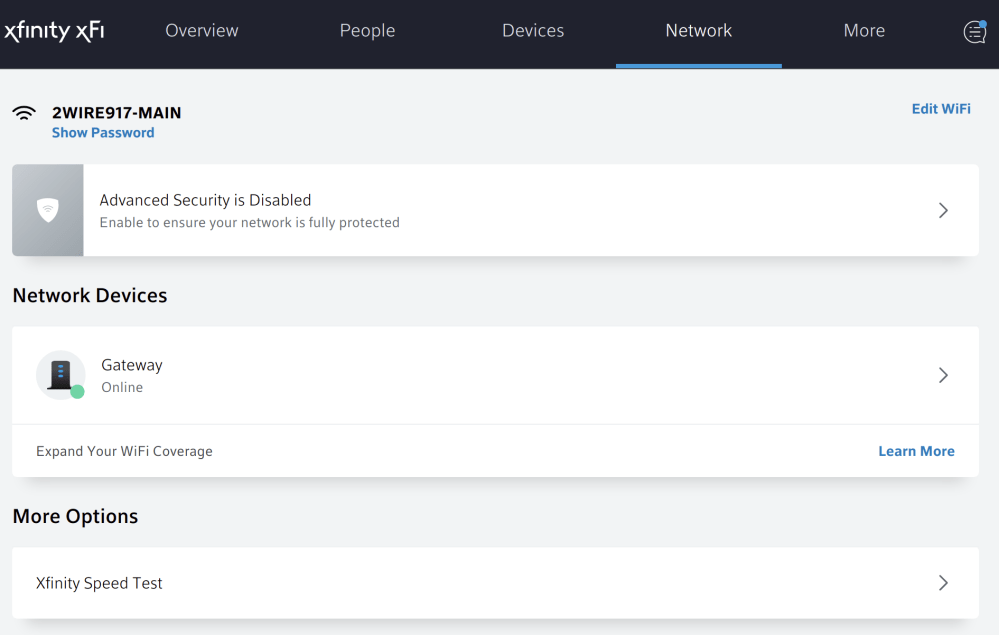
Here you can select your network device in my case it is Gateway. Then you can scroll and under more click advanced settings.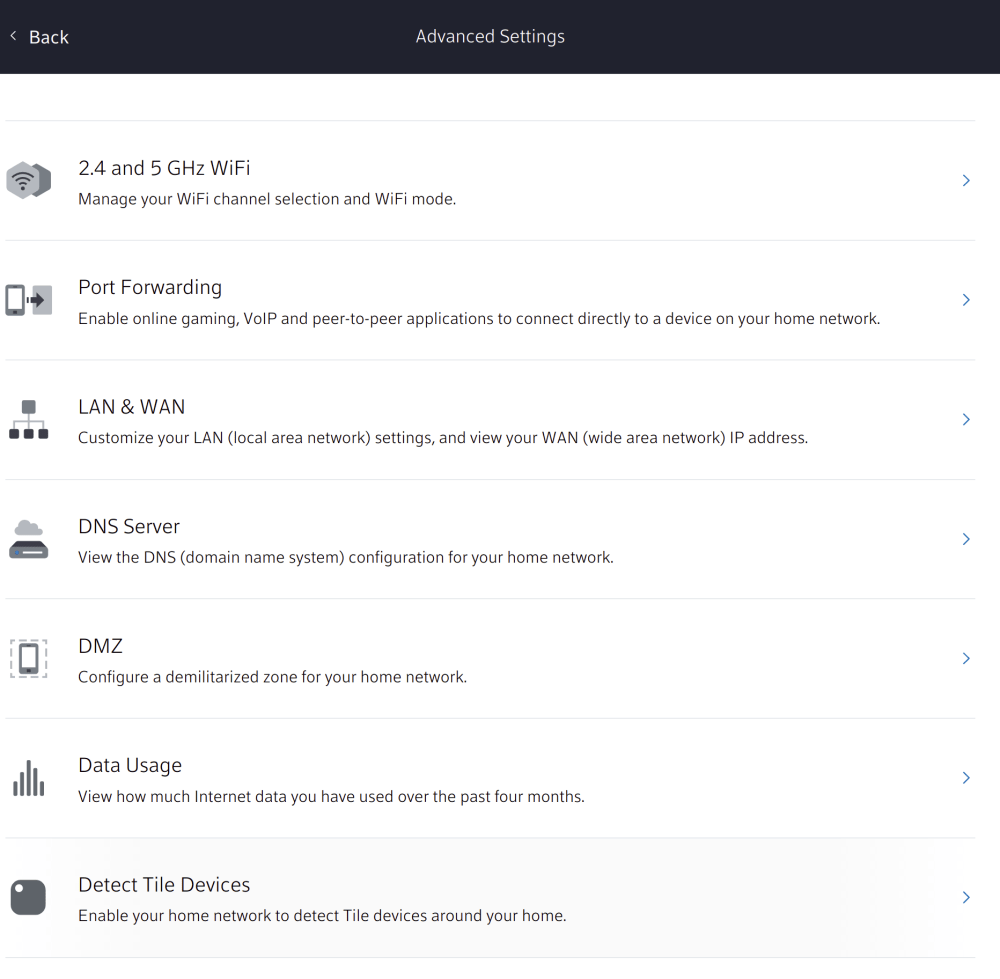
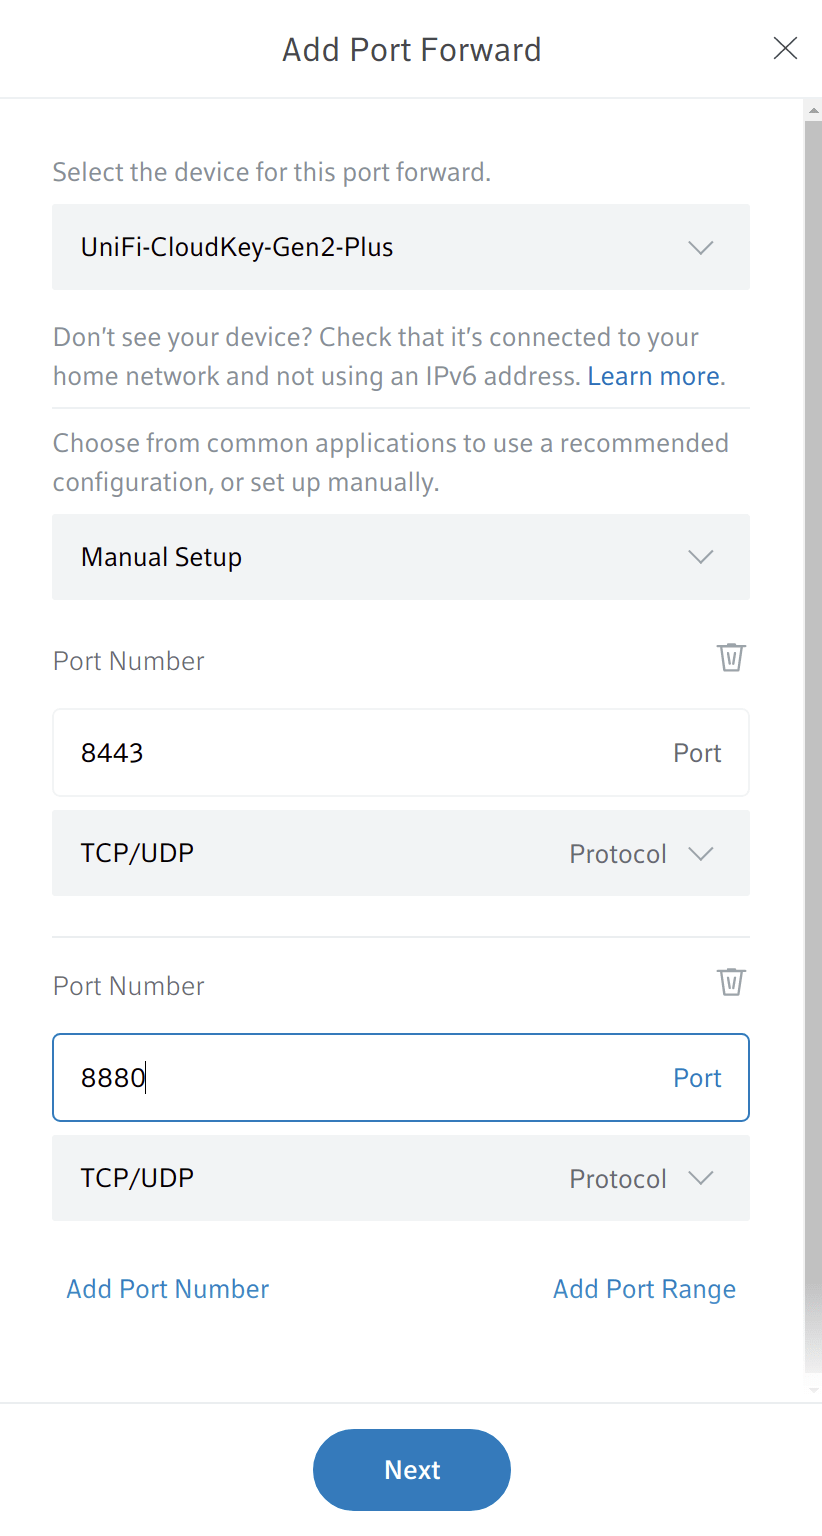
From here you can click port forwarding and you end up on a page asking you to forward a new port. Hit the add port forward button. You can then select a device that you wish to port forward. The device will be whatever is running the cloud controller software in my case a cloud keygen 2 so I select that from the list. You can leave it on the manual setup you would only change this if you are trying to set up a server and would like to use the defaults designed for that server type. You then change the port number to 8443 which is the port that the HTTPS version of the Unifi controller runs on. You can also go ahead and add port 8880 which is where the HTTP version runs.
This should be everything you have to do to port forward your Unifi controller to the public internet. If you have USG present in your network the process is a little different. You must first go into the Unifi controller software within your local LAN behind the USG and go to settings/routing and firewall/port forwarding. Then entire the IP of the device running the Unifi controller and the ports 8880 and 8443 using two different port forwards. From here you can then navigate to your router and instead of selecting the IP address of the device running the controller which you will fail to find, you select the IP address of the USG and forward the same ports 8880 and 8443.
At this point, your Unifi Controller should be available from the public internet. In order to find your public IP go to whats my IP and at the top left of the page you should see the public IPv4 address of your router. Going to https://<your-public-ip>:8443 should send you to the Unifi controller page. I ran into issues with this due to a NAT loopback. It basically prevents you from accessing your routers public IP from within the network itself. Not all routers have this problem but mine did so I simply turned off wifi on my phone and went to this IP address to verify I could access the Unifi controller. This NAT loopback will prevent the social media login feature from working and the guest portal as it will try to connect you to your public IP address which will not resolve. So if you do plan on using any social login features you must resolve this problem either on your router or purchase a router that doesn’t have NAT loopback issues. If you have problems or just wasn’t to verify the port is open you can also use this website and simply enter the port you want to check.
Now that the Unifi controller’s IP is publically accessible we need to assign it to a dynamic DNS hostname. Your Unifi controller is currently tied to a port on your routers public IP address. However, due to the way the internet works your router’s IP address is dynamic meaning it can change at any point in time to a different IP address. We need a way to route to your router from the open internet 100 percent of the time and because IP addresses change we cant use that. Instead, we will create a dynamic DNS for the IP address assigned to your router. Dynamic DNS basically assign a subdomain of a domain to a specific public dynamic IP address, in this case, our router. There is then the software running on any device behind the router that checks into the dynamic DNS service and informs it of its IP. if the IP changes the service will then be updated and that subdomain will still resolve when searched.
There are lots of different dynamic DNS services that are free of use but the default for Unifi and the one I sued for testing was Afraid.org (sick name right). Anyways you first want to set up your own dynamic DNS subdomain by going to afraid.org. From here you want to click dynamic DNS on the left side of the page and then when it asks you for login or account go ahead and create one. Then find the add button to create a new DNS record on afraid.org. The type should remain A your subdomain can be anything of your choosing. When you try to route to this once it is created the hostname will appear as follows <subdomain>.<domain>.com. So subdomain can be whatever you want then you can select from a limited number of domains for free. If you would like this to be on your own domain name you can use a different service such as no-ip to set this up and purchase a domain of GoDaddy. I will describe how to this in more detail when I am working on the final setup. Anyways destination can remain the same it should just be your public IP address then finally enter the Re-captcha check and you’re done. You now have a dynamic DNS service with your records stored.
Now in order for this record to be updated, you need a device inside your network communicating with the DNS service. Now don’t get me wrong technically you don’t need a device checking in with the DNS service. If your IP doesn’t change that often you can always manually rechange it in afraid.org but that’s frankly to annoying for me to bother with. Luckily the USG has built-in features for dynamic DNS. If you don’t have a USG you need to find another tutorial for setting up a dynamic DNS on your local network then you can come back. For the USG navigate to settings/services/dynamic DNS. From here you can create dynamic DNS to run on the USG that will check in with afraid.org.

Under service, you want afraid.org or whatever service you are using to host your records. Under hostname you will want to use the decided upon <subdomain>.<domain>.com. Username and password will be the username and password you sued for afraid.org this allows afraid.org to verify that this device is actually yours and keeps your dynamic DNS secure. The server you can just leave blank. That’s it now you should be able to route to https://<subdomain>.<domain>.com:8443/ and access your Unifi controller. keep in mind the NAT loopback issues this will only work with a device outside your network if that is still a problem.
At this point, you are ready to set up googles social service from the google developers page.

You can go ahead and create a new project and assign it whatever name you want probably should be related to your project. Once this is done to ensure that you are in your project and then you can add an API, in this case, the Google+ API. This will allow our Unifi Controller to communicate with Google servers and allow it to verify and log in with email addresses. Use the search bar to search Google+ and then enable the API for your project. Then navigate to the credentials tab on the left side of the screen and then hit create credentials once your there. You will want to create an OAuth client ID.

Simply replace the domain for the one you registered with on afraid.org for your IP address. Note I copied this off the Unifi tutorial but have yet to verify that it should be HTTP instead of HTTPS but this will also be covered in more detail once I have the final setup done. If you see this invalid origin error go ahead and click the authorized domains list link. and it will take you to the OAuth consent screen. Here you can click edit app on the top. Then scroll down to authorized domains and enter your main domain name so <domain>.com not <subdomain>.<domain>.com. You will then be given a client ID and client secret which will be needed to set up the Unifi controller software. This should be everything you need to do outside of Unifi the rest will be done in the Unifi controller and just consist of network and guest control settings.
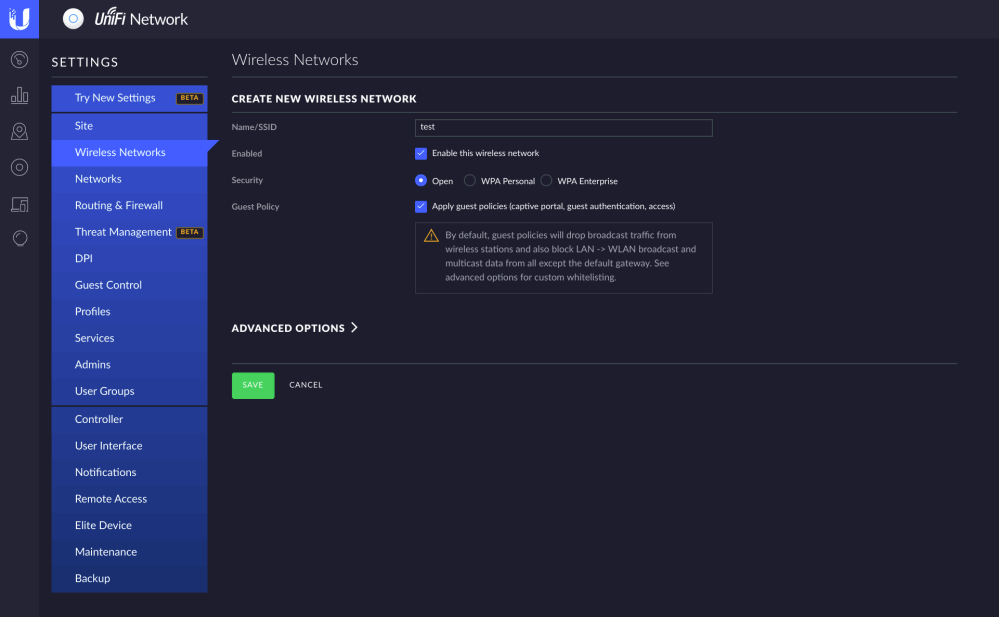
First, you want to create a new wireless network and enable the guest policy button. You can name this network whatever you want then hit save. Then navigate to the guest control tab on the left side. This is where we actually control the settings of the guest portal and how we want users to log on in this case with social media.
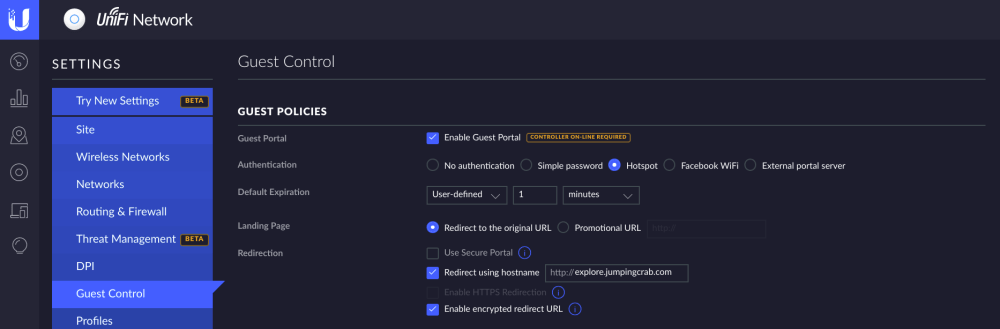
You will want to enable the guest portal then change the authentication to the hotspot. There are several other settings that you can also play around with but the hotspot is what we will use for social media authentication. You then must enter your public hostname under redirect using hostname so <subdomain>.<domain>.com. This will send your device to that hostname when it connects to the internet. Remember if you are still having NAT loopback issues this will NOT work you must resolve the loopback issue first.
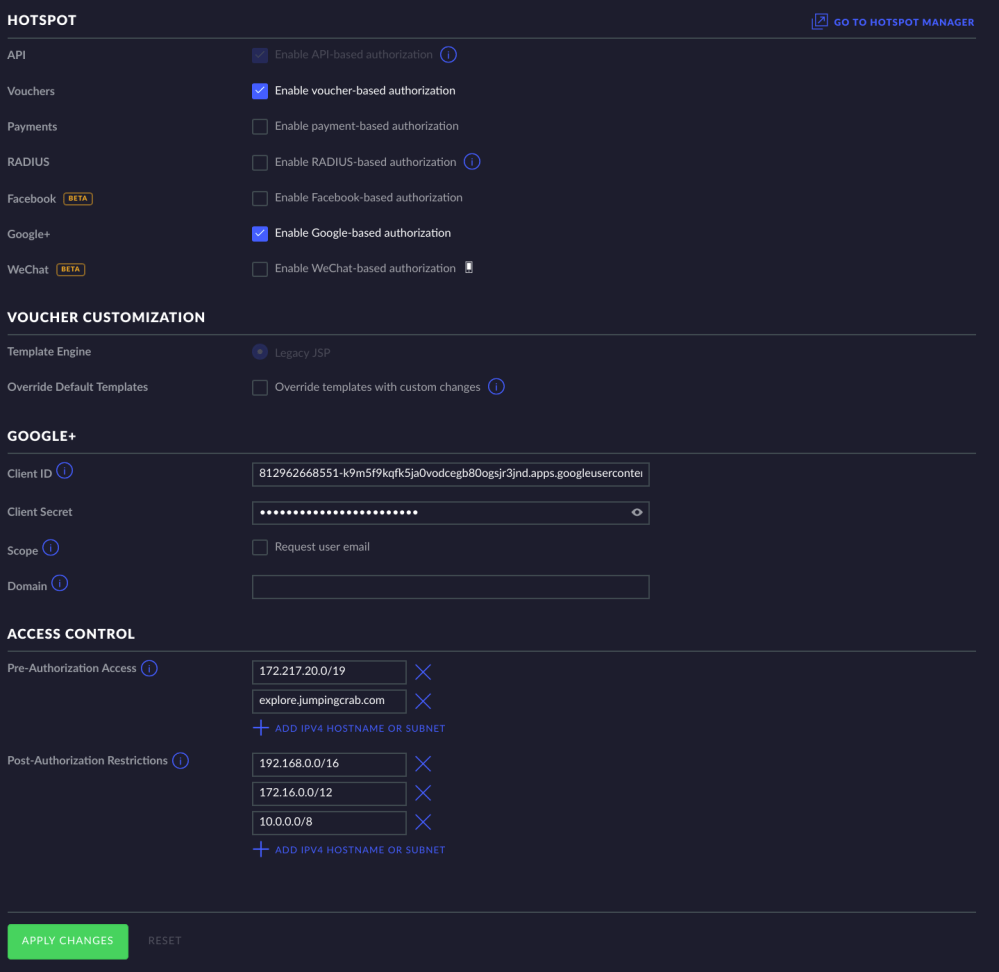
If you scroll down on this page you will see several more settings have appeared. You will want to enable the google based authentication under hotspot. Once this is done you will then enter the Client ID and Client secret that was created when you created the google OAuth certification. You will then need to add 172..217.20.0/19 to your pre-authorization access. This is a Google IP address that allows you to communicate with their servers while on the guest portal. You will also need to add your hostname <subdomain>.<domain>.com to the pre-authorization access so you can actually route to the guest portal.
This should be everything you need to set up google based authentication for the Unifi network. Slightly more involved than their tutorials make it out to be but nonetheless nothing hours of google searchers cant help. Fair warning I have not been able to get this to work due to the NAT loopback error which I am working on solving right now by installing a new cable modem. I will make an update to this tutorial if anything needs to change.
