I was cleaning off my desks today in preparation for Thanksgiving and I found a couple Oculus Quests that Techgarage had bought which kind of sparked my interest in programming them again. There is a real lack of educational VR content especially on the Oculus Quest which is, in my opinion, the best VR headset out there right now because it doesn’t require a base station and still has 6DoF. Anyways, last time I tried to program the oculus quest I ran into quite a bit of problem. First off the quest and the Oculus Go are both android-based VR headsets meaning to program them you need to tell Unity to deploy to an Android device so it knows how to compile the app file. This requires the Android SDK, NDK, and JDK which if not installed properly will break your entire program and prevent it from compiling. For windows, this is less than an issue as Unity can automatically download the proper dependencies and get you designing your game. However, when I tried to this with Unity on Linux I ran into a lot of issues that I didn’t expect and issues that weren’t really explained well on the internet. So I just want to give a short tutorial on how I went about installing everything properly. Remember this is a tutorial for getting you set up for Oculus Quest development using Unity on a Ubuntu 18.04 operating system.
Install JDK
sudo apt install openjdk-8-jdk
By default, ubuntu install openjdk-11 at least at the time of writing this. I found that this wasn’t compatible with the Android SDK install that I was using so I had to downgrade to OpenJDK-8.
java -version
This command verifies that java has been installed properly and you should see something like this.
openjdk version "1.8.0_222"
OpenJDK Runtime Environment (build 1.8.0_222-8u222-b10-1ubuntu1~18.04.1-b10)
OpenJDK 64-Bit Server VM (build 25.222-b10, mixed mode)
Install Android SDK
wget https://dl.google.com/android/repository/sdk-tools-linux-4333796.zip
This retrieves the Android SDK tools from Google repository and downloads them to your current directory. For the most updated Android SDK please see this link and scroll down to command-line tools only and look for the Linux package. Downloading from this page will download the file in your Downloads folder so go ahead and move it into your home directory after it is installed.
unzip sdk-tools-linux-4333796.zip -d androidSDK/
This will extract the content of the SDK tools and put them into a folder called androidSDK in your home directory.
sudo nano ~/.bashrc
This will put you into your bashrc file which runs whenever a terminal is opened. Put the following line into the bashrc file so it will run when the terminal opens. Replace [username] with whatever your computer’s username is.
export PATH=/home/[username]/androidsdk/tools/:/home/[username]/androidsdk/tools/bin:$PATH
To verify the install run the following command.
sdkmanager --list
This should result in the following output along with some more lines below it but this is all that really matters.
Installed packages:=====================] 100% Computing updates...
  Path                 | Version | Description                    | Location
  -------              | ------- | -------                        | -------
  tools                | 26.1.1  | Android SDK Tools 26.1.1       | tools/
Now that you have the basic android SDK tools installed Unity still requires two more packages in order to run properly. These packages are build-tools and platform-tools. Please run the following lines in the terminal to install them.
sdkmanager "build-tools;29.0.0"
sdkmanager "platform-tools"
Run the following command again.
sdkmanager --list
Your new output should look like the following.
Installed packages:=====================] 100% Computing updates...
  Path                 | Version | Description                    | Location
  -------              | ------- | -------                        | -------
  build-tools;29.0.0   | 29.0.0  | Android SDK Build-Tools 29     | build-tools/29.0.0/
  platform-tools       | 29.0.5  | Android SDK Platform-Tools     | platform-tools/
  tools                | 26.1.1  | Android SDK Tools 26.1.1       | tools/
Keep in mind that the version numbers were the most recent at my time of installation and if you would like to install whatever the newest version is simply run sdkmanager –list and scroll through the available packages and install the most recent one instead. However, I am not sure how newer packages work with Open-JDK or with Unity so I would advise against this if you don’t need to.
Install Unity
The most recent version of Unity for me was 2019.2.14f1 and I am not sure what Unity or Oculus may have changed in the future in terms of building Oculus apps with Unity so if you would like to follow the rest of the tutorial stick with 2019.2.14f1 if not your on your own and good luck you should have JDK and SDK version that will be able to at minimum compile your game.
Now for the rest of you who just want to stick with me your going to want to download the Unity Hub for Linux. After the install log in with a Unity account and navigate to the Installs tab on the left-hand side. Then press Add in the top right corner and select Unity 2019.2.14f1 as the version and hit next.
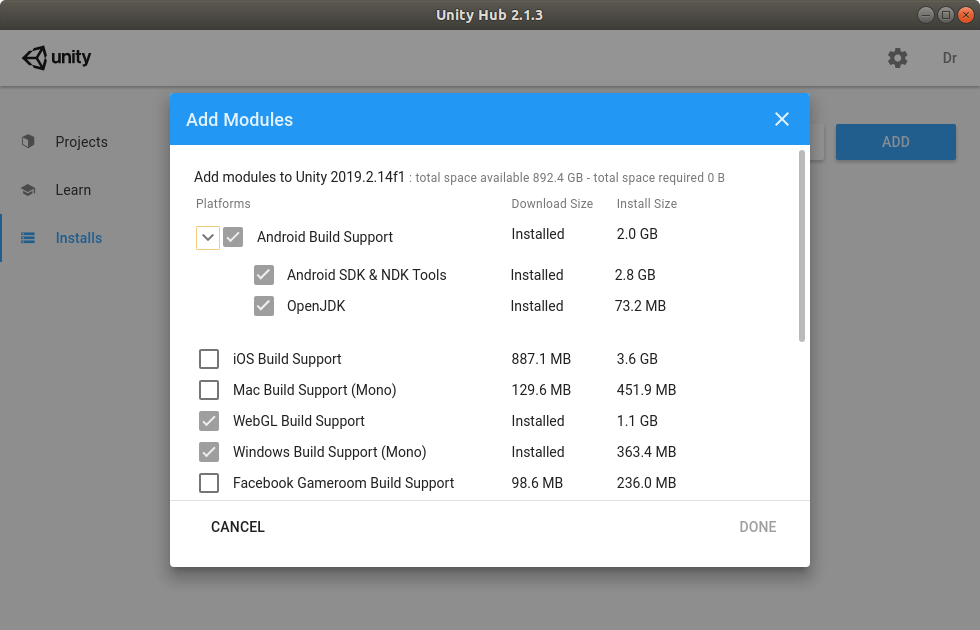
You are going to want to check all the boxes that I did to build support. I am not sure if Windows or WebGL build support is required but I usually always check those boxes so I just did it anyway. Also as you can see there are boxes for Android SDK and NDK as well as OpenJDK install. When I looked in the Unity install file after downloading this unity version it did, in fact, have folders for the SDK and JDK but when I tried to build it was giving an error saying it could not find the SDK or JDK which is why I had you perform the previous steps of installing it manually.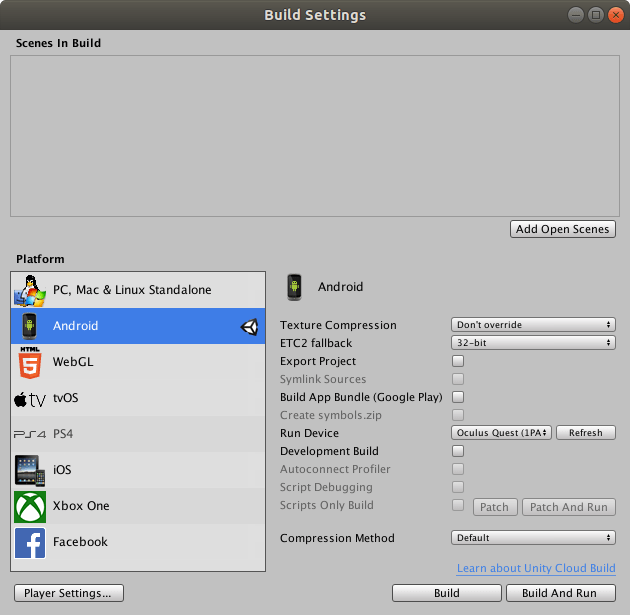
Once Unity is installed create a new project and navigate to the build settings under the file tab. here you want to select Android and click the button that says switch platform.
Now go to Preferences under the edit tab and uncheck the JDK installed with Unity and the Android SDK Tools installed with Unity boxes. You can then path to the JDK using the same path I provided in the image above. Your SDK path will vary slightly as it should use your username instead of mine.
JDK
/usr/lib/jvm/java-1.8.0-openjdk-amd64
SDK
/home/[username]/androidsdk/
With your new SDK and JDK path selected your game should be able to compile but we still need to provide VR support for Unity.
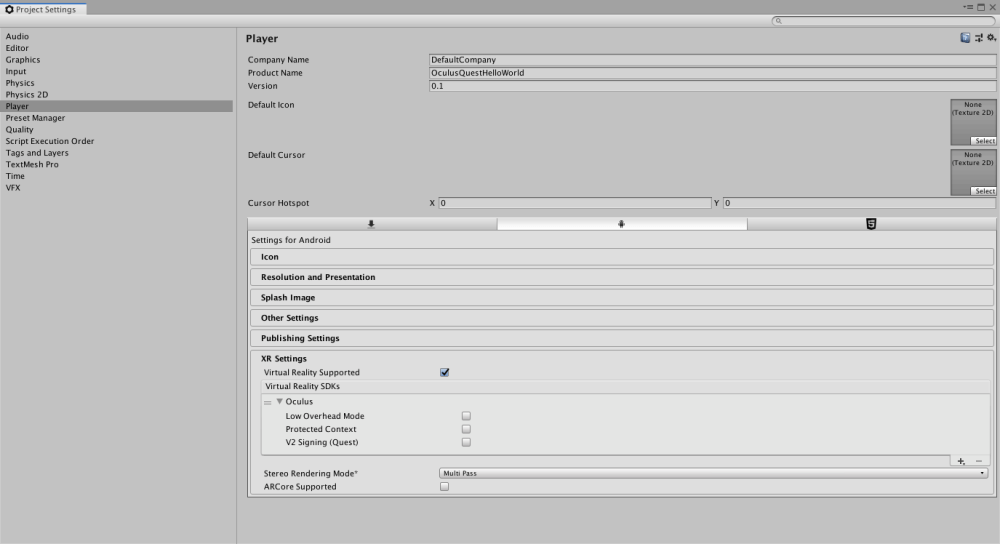
Navigate to the project settings under the edit tab and go to the XR settings menu as shown above. Then check Virtual Reality Supported then click the plus sign and select Oculus. 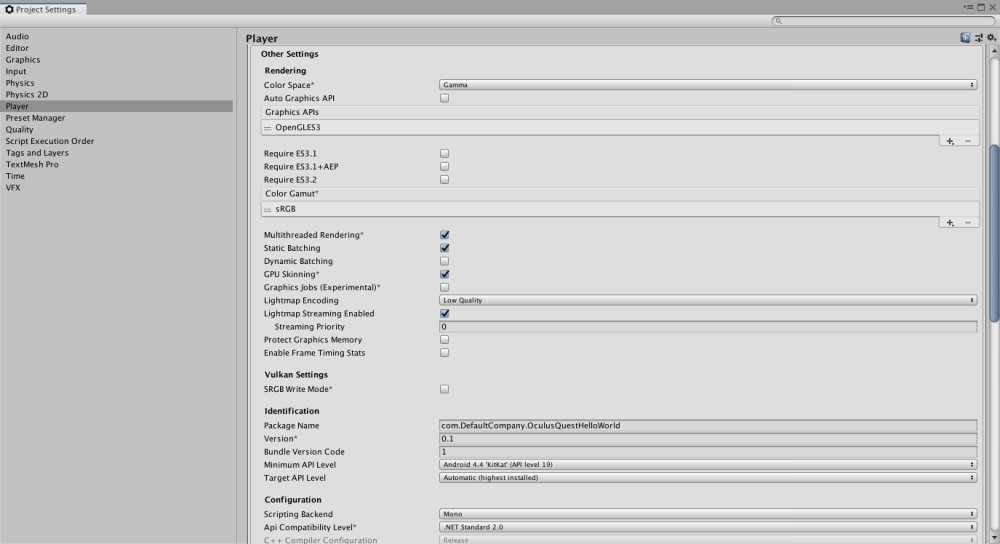
Next, you want to go to the other settings tab and select Vulkan under Auto Graphics API and remove it by pressing the minus sign in the bottom right of the box. Then go down to the Minimum API Level and select Android 4.4 as the Minimum API level. If you do not change this setting Unity will error out when building the program and say that Oculus requires a Minimum API level of 4.4.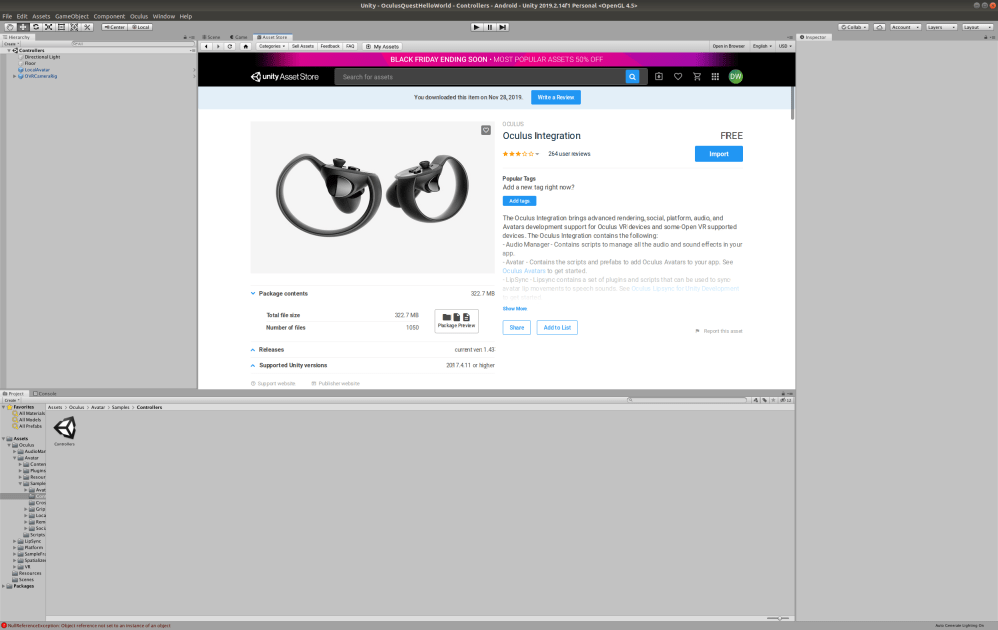
Go to the asset store and find the Oculus Integration asset and download then import it into your project. This should give you everything you need to start developing games for the Oculus Quest.
Verify Device is Connected
Assuming your headset is turned on and is in developer mode go ahead and plug it into your computer. Now your Oculus should have a notification asking you to accept the computer key. If this happens then your all set and you can build and run your Unity games. If you’re like me and this does not happen you have two more steps. Run the following line.
adb devices
If you do not see a device other than the android emulator and get an error talking about Udev permission I can help you. If this isn’t your case you could have another problem and I can’t help you but you know just try this and see if it works for you. Run the following line.
lsusb
Your results should look something like this.
Bus 004 Device 001: ID 1d6b:0003 Linux Foundation 3.0 root hub
Bus 003 Device 001: ID 1d6b:0002 Linux Foundation 2.0 root hub
Bus 002 Device 001: ID 1d6b:0003 Linux Foundation 3.0 root hub
Bus 001 Device 002: ID 0bda:0811 Realtek Semiconductor Corp.
Bus 001 Device 004: ID 258a:0001
Bus 001 Device 003: ID 1532:003e Razer USA, Ltd
Bus 001 Device 020: ID 2833:0183
Bus 001 Device 001: ID 1d6b:0002 Linux Foundation 2.0 root hub
If you unplug your Oculus and run the line again you should get a similar result minus one device.
Bus 004 Device 001: ID 1d6b:0003 Linux Foundation 3.0 root hub
Bus 003 Device 001: ID 1d6b:0002 Linux Foundation 2.0 root hub
Bus 002 Device 001: ID 1d6b:0003 Linux Foundation 3.0 root hub
Bus 001 Device 002: ID 0bda:0811 Realtek Semiconductor Corp.
Bus 001 Device 004: ID 258a:0001
Bus 001 Device 003: ID 1532:003e Razer USA, Ltd
Bus 001 Device 001: ID 1d6b:0002 Linux Foundation 2.0 root hub
As you can see I am now missing this device.
Bus 001 Device 020: ID 2833:0183
Now I know this is my Oculus and I know what its ID is. Write down or take a picture of the last two numbers for my case it was 2833 and 0183. You are going to be editing the android udev permissions file by running this command.
sudo nano /etc/udev/rules.d/51-android.rules
In this file, we will be putting the following line.
SUBSYSTEM=="usb", ATTR{idVendor}=="2833", ATTR{idProduct}=="0186", MODE="0666", GROUP="plugdev"
You should replace my Vendor ID and Product ID numbers with whatever you wrote down. Now reload the UDEV rules and unplug and plug back in your headset.
sudo udevadm control --reload-rules
If you run adb devices you should no longer get the udev error and you should actually get the popup notification in the headset asking to accept the computer key.
Conclusion
Alright if you made it this far I think you’re in pretty good shape. These are all the problems that I ran into when I was setting up my Unity environment and my headset. This isn’t to say this is everything you have to do to get it working on your computer and you might still have to do some quick debugging. I really just wanted to put this in one tutorial online as I had to try a bunch of different fixes until I actually got it working as no one was specifically developing Unity apps for the Oculus Quest on Linux. So I hope this helped and you are up and running and developing some awesome games!

Thanks for this tutorial! Will try it soon
LikeLike
I am having issues with the bash file. I used the command you said to use but it just says /home/[my username]/ is a directory and wont find the sdk manager after that. Any advice?
LikeLike
I’m assuming you’re talking about this command sudo nano ~/.bashrc? If so that’s odd you should just be able to enter that in your ubuntu terminal with no problems. If you are referring to an error when you run sdkmanager go back and verify this command export PATH=/home/[username]/androidsdk/tools/:/home/[username]/androidsdk/tools/bin:$PATH. Are you certain you extracted the sdk zip to the androidSDK folder.
LikeLike